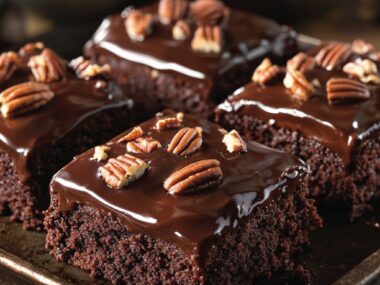
Okay, so buckle up buttercups, because I’m about to share one of my absolute favorite little chocolatey secrets. Now, technically this isn’t a *traditional* fancy-pants layered rococo cake, you know, the kind that looks like it belongs in a museum display? Nah, this is my *home cook* version. Think of it as a super fudgy brownie-adjacent square, all dressed up in chocolate and crunchy nuts or crumbs. The name just stuck because they look kinda fancy and are ridiculously rich, just like how I imagine rococo art feels, but way more edible.
I first stumbled onto something like this years ago, tweaking and messing about in the kitchen, probably trying to use up some leftover nuts. And boy, did I land on a winner! Now, these Rococo Bites (that’s what I usually call ’em!) are requested for pretty much every potluck, holiday, and frankly, any Tuesday that feels a bit dreary.
Why I Keep Making These (And You Should Too!)
Honestly? They disappear like magic. Seriously, I make a big batch and if I turn my back for too long, they’re gone. My kids go absolutely wild for the combination of fudgy inside and crunchy outside. Plus, they keep surprisingly well (if they last that long, ha!). They’re also surprisingly forgiving. Mess up the bake time a little? No sweat, they’ll still be delicious. And you can totally play around with the coating, which is always fun.
I make these when I need a guaranteed crowd-pleaser without spending hours decorating. Or just when I need a really, really good chocolate fix. (Don’t we all have those days?)
Stuff You’ll Need (Ingredients)
Alright, here’s the list. Don’t freak out, most of this is pantry staples.
- 170g unsalted butter, melted (a good knob!)
- 200g granulated sugar
- 100g light brown sugar (adds chewiness!)
- 2 large eggs
- 1 teaspoon vanilla extract
- 85g unsweetened cocoa powder (use a decent one, it makes a difference!)
- 65g all-purpose flour
- ½ teaspoon salt
- ½ teaspoon baking powder
- 200g good quality chocolate (I like dark or semi-sweet chips or a chopped bar)
- 1 tablespoon vegetable oil or coconut oil
- About 150-200g finely chopped nuts (walnuts, pecans, almonds are great) OR crushed cookies (like amaretti or shortbread) OR shredded coconut. Get creative!
Quick notes on ingredients: I sometimes use half butter and half vegetable oil in the base if I’m feeling lazy and don’t want to melt butter. Works totally fine! For the chocolate coating, honestly any chocolate you like will do, milk, dark, whatever floats your boat. My grandma always used Cadbury, but honestly, any version works fine. And the nuts? Whatever you have! I’ve even used crushed pretzels for a sweet and salty thing – not *rococo* maybe, but darn tasty.
Let’s Get Baking (Directions!)
Okay, deep breaths. This is easy-peasy.
1. Preheat your oven to 175°C (350°F). Grease and flour or line a 20x20cm (8×8 inch) square baking pan with parchment paper, leaving some overhang so you can lift it out later. Trust me on the overhang bit.
2. In a medium bowl, whisk together the melted butter and both sugars until it looks kinda glossy. This takes maybe a minute? Don’t overthink it.
3. Beat in the eggs one at a time, then stir in the vanilla. Make sure everything is combined. It will look a bit lumpy maybe, don’t worry about it!
4. In a separate small bowl, whisk together the cocoa powder, flour, salt, and baking powder. This helps avoid weird lumps later.
5. Gradually add the dry ingredients to the wet ingredients, mixing until just combined. Don’t overmix! A few streaks of flour are okay, they’ll disappear when baking. The batter will be thick. This is where I usually sneak a taste of the raw batter (shhh, don’t tell!).
6. Pour the batter into your prepared pan and spread it evenly. Pop it in the oven for 25-30 minutes. You want the edges to look set but the center still a *tiny* bit soft. A toothpick inserted into the center should come out with moist crumbs, not completely clean.
7. Let the brownie base cool *completely* in the pan. This is important! Like, walk away and go do something else important. Once cool, use the parchment overhang to lift it out onto a cutting board.
8. Cut the cooled base into small squares. I usually aim for about 3-4cm (1-1.5 inch) squares. You’ll get about 25-36 pieces depending on how big you cut ’em.
9. Now for the fun part! Put your chopped nuts or crushed cookies or whatever coating you chose in a shallow dish.
10. In a microwave-safe bowl, combine the 200g chocolate and 1 tablespoon oil. Microwave in 30-second intervals, stirring well after each, until completely smooth and melted. Be careful not to overheat! Alternatively, you can melt it gently over a double boiler.
11. Using a fork or a couple of spoons, dip each square into the melted chocolate, letting any excess drip off. Then gently place it in the dish of nuts/crumbs and roll it around until it’s coated on all sides. Place coated pieces on a parchment-lined baking sheet.
12. Once all the squares are coated, pop the baking sheet into the fridge for 15-20 minutes to let the chocolate set up properly. And there you have it! Your gorgeous, slightly-more-approachable rococo cake bites.
Things I’ve Learned (Notes)
- Cooling is KEY. Trying to cut or coat warm brownies is a disaster, trust me, I learned the hard way.
- The oil in the chocolate makes it smoother for dipping and helps it set up without cracking. Don’t skip it!
- Don’t overbake the base. You want it fudgy, not dry.
- Finely chop the nuts or crumbs. Too big and they won’t stick nicely.
Variations I’ve Tried
Oh, I’ve played around! Using white chocolate for the coating is lovely, especially with dried cranberries in the mix. Dark chocolate with crushed coffee beans is amazing for coffee lovers. One time I tried using crushed potato chips… that was an interesting experiment. Not bad exactly, just not my favourite for this particular treat!
I’ve also added chocolate chips *into* the brownie base before baking, which is, you know, more chocolate. Can’t go wrong there, eh?
Equipment You’ll Need
Pretty basic stuff:
- 8×8 inch square baking pan
- Mixing bowls
- Whisk or spatula
- Measuring cups and spoons (or scales, if you’re precise!)
- Microwave or saucepan for melting chocolate
- Shallow dish for coating
- Parchment paper
- Baking sheet
- A knife for cutting
Pro tip: If you don’t have an 8×8 pan, you can use a slightly larger rectangular one, the brownies will just be thinner. You could also use a muffin tin liner for individual little rounds, though cutting into squares is easier.
How to Store These Beauties
Keep them in an airtight container at room temperature for 3-4 days, or in the fridge for a bit longer. I actually think they taste even better the next day, the flavors just meld! Though honestly, in my house it never lasts more than a day… maybe two if I hide them.
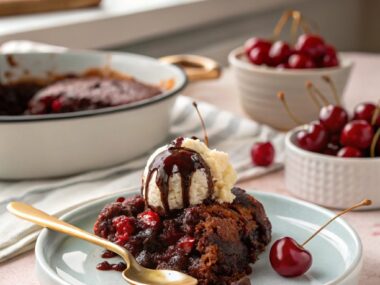
Serving ‘Em Up
Just arrange them on a pretty plate! They’re perfect on their own with a cup of tea or coffee. We sometimes serve them as part of a dessert platter for parties. My personal favorite way? Straight from the fridge, with a big glass of milk. Simple as that.
A Few Lessons Learned (Pro Tips)
I once tried rushing the cooling step and regretted it because the brownies crumbled when I tried to cut them. Patience is your friend here.
Make sure your coating (nuts, crumbs, etc.) is ready *before* you melt the chocolate. The chocolate sets up relatively quickly, and you don’t want to be frantically chopping nuts with dripping chocolate everywhere.
Don’t dump the chocolate-dipped square straight into a *huge* pile of nuts. Roll it gently, pressing lightly if needed, so you get a nice even coat without losing half the nuts back into the dish.
Got Questions? (FAQ)
Can I use a different size pan?
Yeah, sure! Just adjust the baking time. A bigger pan means thinner brownies, so they’ll bake faster. Keep an eye on ’em.
My chocolate seized! Help!
Oh, bummer! That usually happens if a tiny bit of water gets in or it overheats. You can sometimes rescue it by stirring in a spoonful of hot (not boiling!) milk or cream until it smooths out, but sometimes you just have to start over. Sorry! Try melting more gently next time, maybe over a double boiler.
Can I make these gluten-free?
I haven’t personally tried it with this exact recipe, but I reckon you could probably swap the all-purpose flour for a good gluten-free blend. The base is pretty fudgy anyway so it might work beautifully!
How do I make the coating stick better?
Make sure the chocolate isn’t too hot when you dip, and roll immediately. Press gently if needed. Also, make sure your nuts or crumbs are finely chopped.
Are these *really* rococo cake?
Okay, okay, no. Not in the classical sense! They’re my little homage, inspired by the richness and decoration. Think of them as Rococo-inspired Bites! They’re way easier and still feel kinda special. Call ’em what you like, just make ’em!
Anyway, hope you give these a whirl! Let me know if you do, I’d love to hear how they turn out for ya. Happy baking!